
Suited for:
Freelancers, Smbs, Enterprises, Startups, Agencies
Helps with:
Chat and Web Conferencing,File Sharing Software,Note Taking, ...
Languages:
English
What is it all about?
Bolste is the only all-in-one business solution (BOS) that requires no IT setup and people can immediately start working simpler, In addition, unlimited external guest users can join Bolsters for free!
Video
Video & screenshots
screenshots
Who is it for?
Freelancers
Startups
Agencies
SMBs
Enterprises
Key Features
Customize branding, connect to co-workers, share files, assign tasks, make notes, organize calendars, track projects, contact database, group chat, measure usage, and much more - all from one system, with one login.
Benefits
Bolste is the only all-in-one Business Operating System (BOS) that replaces every outdated app or software being used by companies in order to streamline their organizations and make work easy for people.
Advertisement
Pricing
Yearly
Monthly
Lifetime
Free
Freemium
Trial With Card
Trial No Card
By Quote
Description
$9.99/user/month
$100/user/year
starting at
$9.99/Month
for 1
User
starting at
$100/Year
for 1
User
Integrates With
Dropbox
Outlook
Open API


Product Analysis


Bolste is a new competitor in the collaboration space. Organizations have come to realize that enhanced collaboration is one of the keys to employee productivity. In many companies, collaboration involves several different products from different vendors. Employees need to contend with different design philosophies and different interfaces, while the company needs to pay for and support multiple systems.
Bolste calls their product a complete “business operating system.” An SaaS product, Bolste is an all-in-one, cloud-based collaboration platform designed to work on desktop computers as well as mobile devices. Bolste allows users to organize their work in secure collaborative workspaces called “Bolsters,” where all the tools and information for a specific project are grouped together. By combining multiple collaboration tools into an integrated package, Bolste aims to make your employees even more productive, while driving down your company’s cost per user.
In this review I took advantage of their free 14-day trial to test Bolste with two users.
Life Without Email
One of the main targets in collaboration products is email. More specifically, these products aim to eliminate the use of email to the maximum extent possible. Bolste is no exception.
Studies indicate that employees typically spend more than 2 hours a day working in their email. Some significant percentage of that time is spent simply looking for information that is in one of the hundreds of email messages a typical employee receives each week. This is a huge drag on productivity.
Bolste eliminates this drag by eliminating the use of email within their service. As you will see, the service allows users to communicate and work with all aspects of the project, without sending email messages. They can also comment on activities and documents within the Bolster, schedule activities or meetings, and assign tasks to themselves or others. They can even collaboratively edit documents in real time. If your organization relies on collaborative work, Bolste offers the potential for significant gains.
Each user’s home base within the Bolste service is called, “My Bolste.”
Working in My Bolste
My Bolste is divided into six sections, which you can access using the options on the left side of the Bolste window.
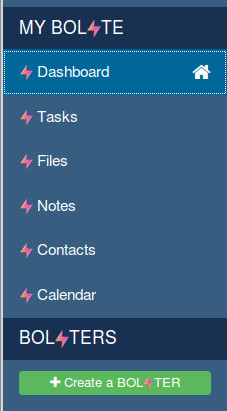
As you can see, the six sections are:
- Dashboard
- Tasks
- Files
- Notes
- Contacts
- Calendar
Let’s look at each of these sections in more detail.
Dashboard
The Dashboard shows you everything that is going on in the areas of Bolste that you have access to. In other words, you will see updates for any activity that takes place in your own account. You will also see activity or status updates for any Bolsters you are a member of.
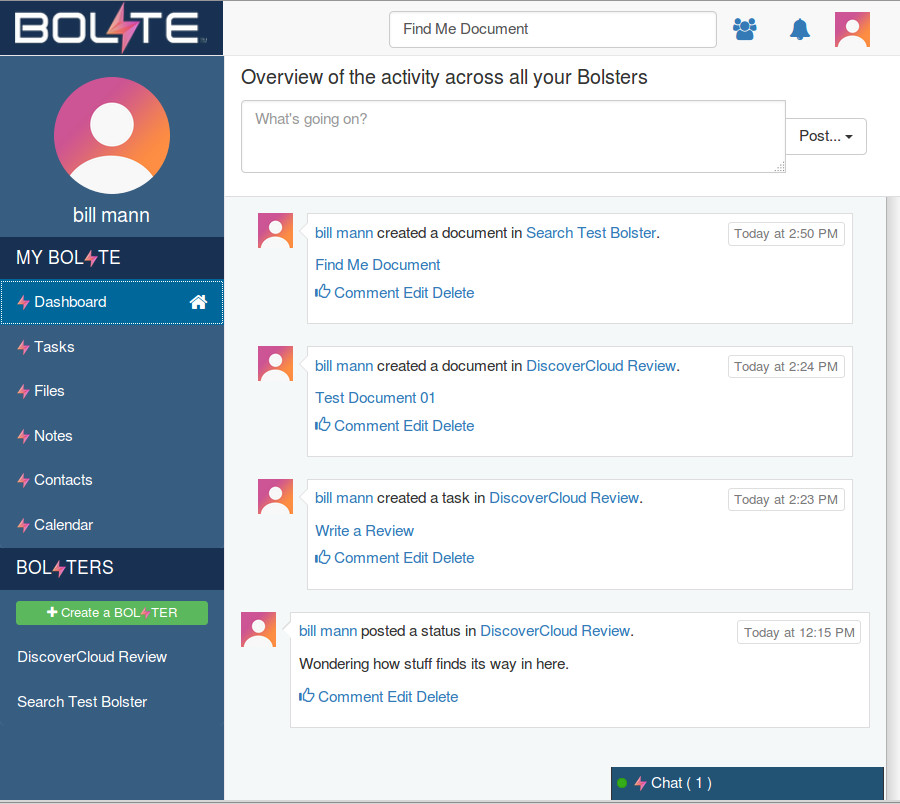
The Dashboard is central to the productivity boost Bolste offers. It allows you to quickly see anything that could be relevant to you across all of your projects.
With Bolste, you don’t have to constantly check each of your projects areas looking for changes. You don’t have to monitor multiple collaboration tools to get the full picture of what’s going on in each project. Nor do you have to dig through a stack of emails looking for messages or attachments relevant to your projects.
All that information is right there in your Dashboard. The Dashboard also makes it easy to respond to updates or status messages without going to other sections of the service. You can:
- Click the “thumbs up” icon beneath an activity message to indicate that you like it.
- Click Comment to reply to the message with a comment of your own.
- Type a short comment into the “What’s going on?” box near the top of the Dashboard. Then click the Post button to the right of the field to see a list of all the Bolsters you belong to. Click the Bolster you want and in seconds your status update will appear in that Bolster.
Employees involved in multiple projects will clearly be able to save a lot of time by monitoring their projects through the Dashboard.
Tasks
As you would imagine, this section of My Bolste allows you to create, edit, and view tasks. Although at first glance it looks very sparse, the features you need are all here.
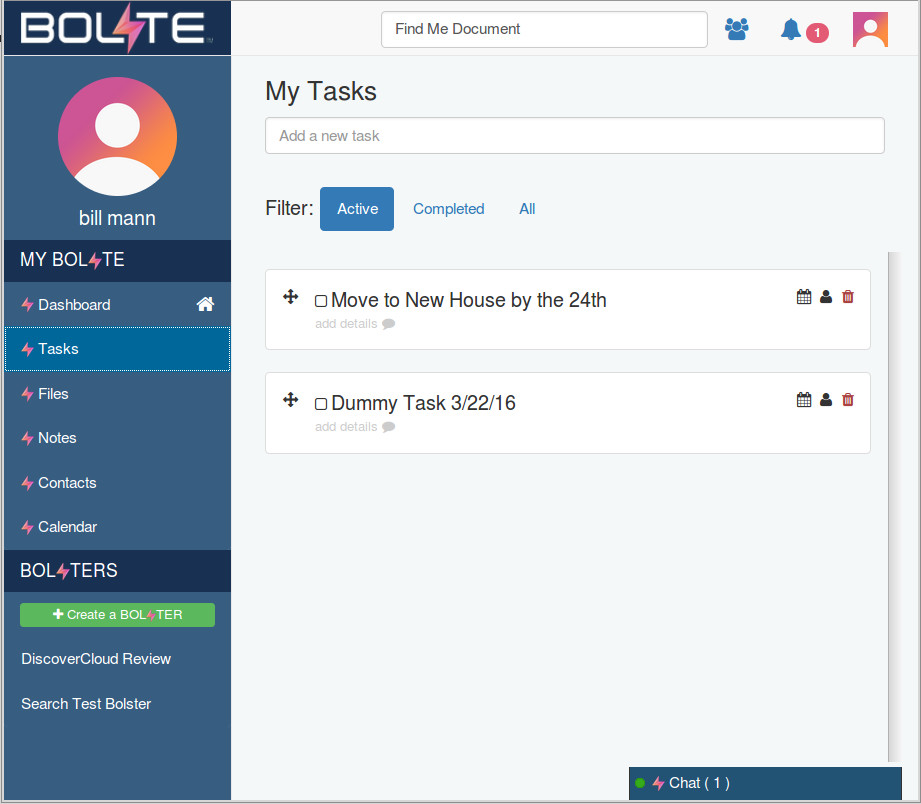
To create a task, you enter the subject of the task into the “Add a new task” field. The software creates a new task with that subject, and adds it to your Task list. For basic reminders this should be sufficient. But if you need to create more sophisticated tasks, Bolste has you covered.
As you can see in the preceding screen shot, there are several icons associated with each task that you create. You can:
- Drag the 4-headed arrow on the left to change the position of a task in the list
- Mark the checkbox next to the subject of the task to indicate that it is complete
- Click the dim “add details” area below the subject to add more information for this task. The editor that appears is powerful, allowing not only text but also lists, links, and even multimedia elements
- Click the calendar icon to the right of the subject to enter a due date
- Click the assign icon (it looks like the silhouette of a person) to assign the task to someone else
- And of course the red trash can icon on the far right of the task lets you delete the task completely
While you may want to, or be required to, keep a record of all your completed tasks, all those old tasks can really clutter your Task list after a while. That’s why Tasks allows you to filter the tasks it displays. The three options are Active (tasks that are not yet completed), Completed (only those tasks that have been marked as complete), and All.
Files
This section of My Bolste allows you to upload, download, and view files. As you can see from the screen shot below, it is a very clean, basic interface.
The icons next to the name of each file do what you would expect them to do. The columns are sortable by file name, size, and the date the file was uploaded. You click the Upload button to upload a file. The Upload button gives you a list of locations you can upload from. Right now the options are just your computer or DropBox.
In general, I like the way the company has kept the interface clean by eliminating less-used options. However this is one place where it would be helpful in the future to offer more integration options, or offer custom integration services for large customers.
Notes
This section of My Bolste allows you to create multimedia notes for your own reference. The screen shot that follows shows the Notes section after I have created some notes.
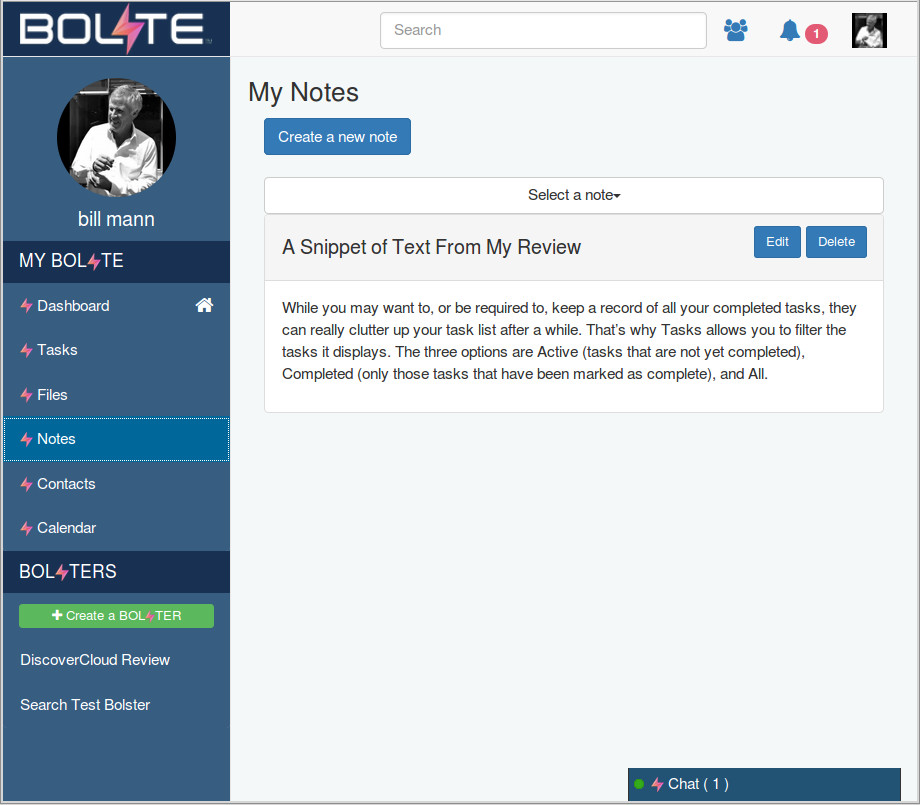
You click the blue “Create a new note” button to add a note. Each note has a separate title and body. The title is a line of plain text. The body uses the same powerful editor as Tasks, meaning your notes can include formatted text, links, photos, and multimedia content.
You can add content to the body of a note by dragging and dropping it into the editor, or by entering the Internet address where the content can be found. Click the Save button below the body of the note when you are done.
Once you have created one or more notes, the appearance of this section varies, depending on the size of the Bolste window. The last note you worked on appears in the window, with Edit and Delete buttons next to the title.
If the window is sufficiently large, a list with the titles of all your notes appears directly to the left of the note that is currently visible. You can click one of these to open that note.
If your screen is smaller or you are on a mobile device, the list of notes does not appear. Instead, between the “Create a new note” button and the title of the note is a white bar or button called, “Select a note.”
Clicking “Select a note” displays a list of the titles of all your notes. Click the note you want to view to make it appear in the window.
Contacts
In this section, you can view your contacts as well as invite people to join Bolste so you can collaborate with them. Take a look at the following screen shot:
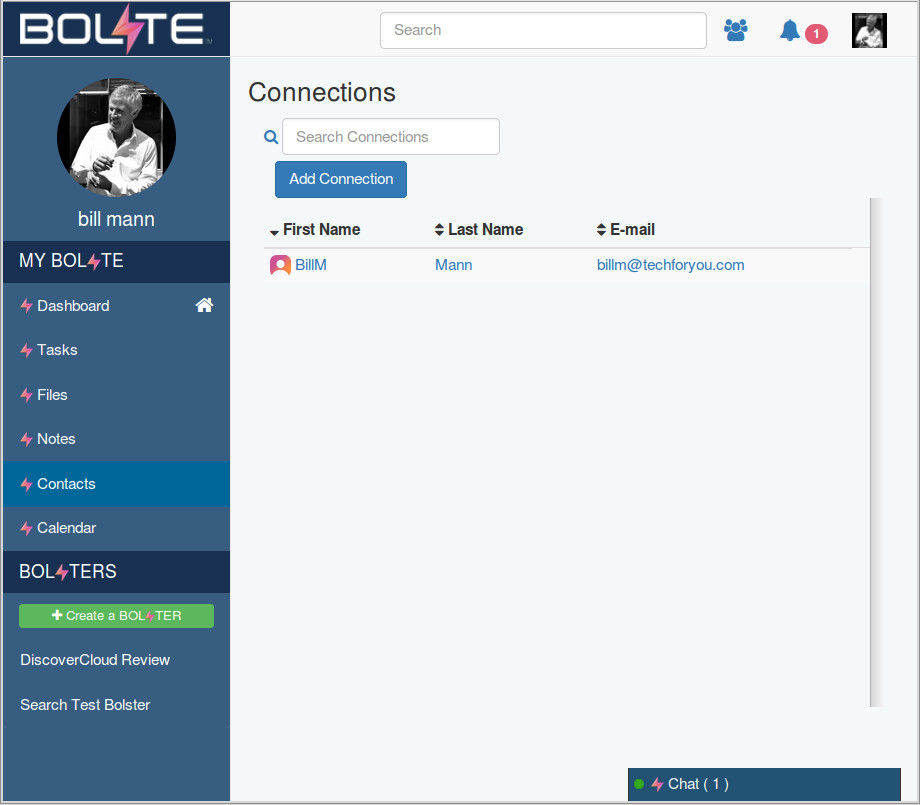
Your current contacts appear in a list that you can sort by first name, last name, or email address. You can search using the Search Connections field.
If you click on a contact in the list, Bolste displays that contact’s Bolste Profile. If you click the Add Connection button you can send email invitations to people inviting them to join Bolste.
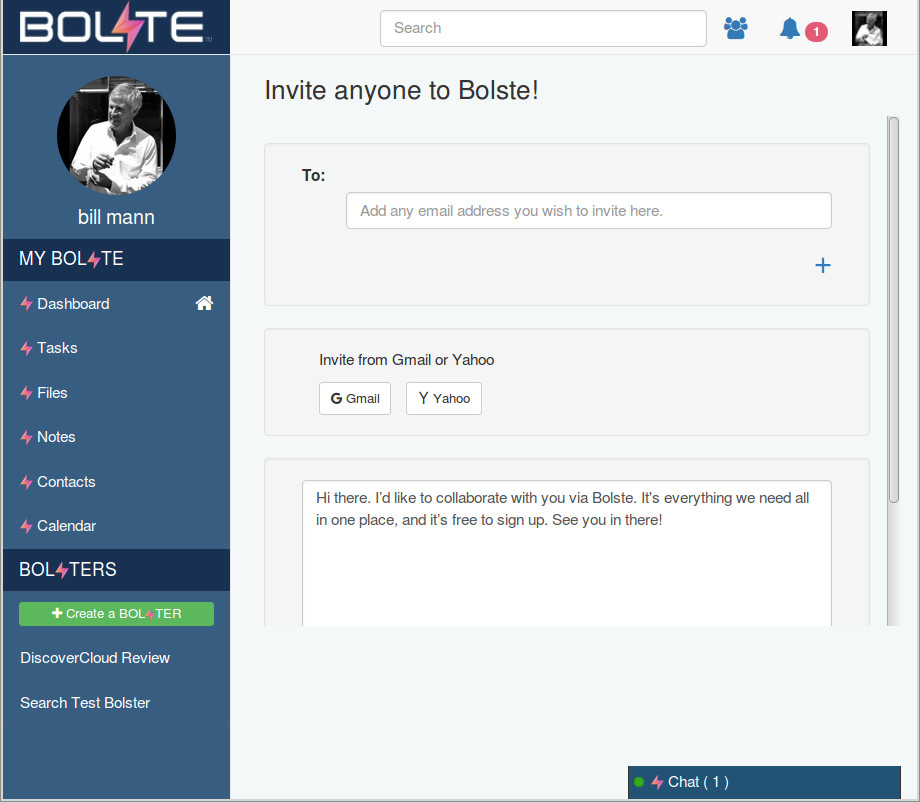
There are two ways to specify who you want to invite in this window:
- Type their email address into the To: field. You can add multiple people here by clicking the plus sign ( + ) below the field.
- Click one of the buttons under the heading, “Invite from Gmail or Yahoo.” If you do this, Bolste opens a new window to the appropriate service. You can log in and give Bolste access to all your contacts in that service so you can select the ones you want to invite.
Once you’ve told the software everyone you want to invite, scroll to the bottom of the window and click Send to mail out the invitations.
I found the terminology in this section to be a bit confusing. While this is the Contacts section, all the text in the section refers to Connections, rather than Contacts. Bolste can eliminate potential confusion by standardizing on one term or explaining the difference between the two somewhere in the product.
Calendar
The Calendar section works like any other online calendar. Here’s what it looks like:
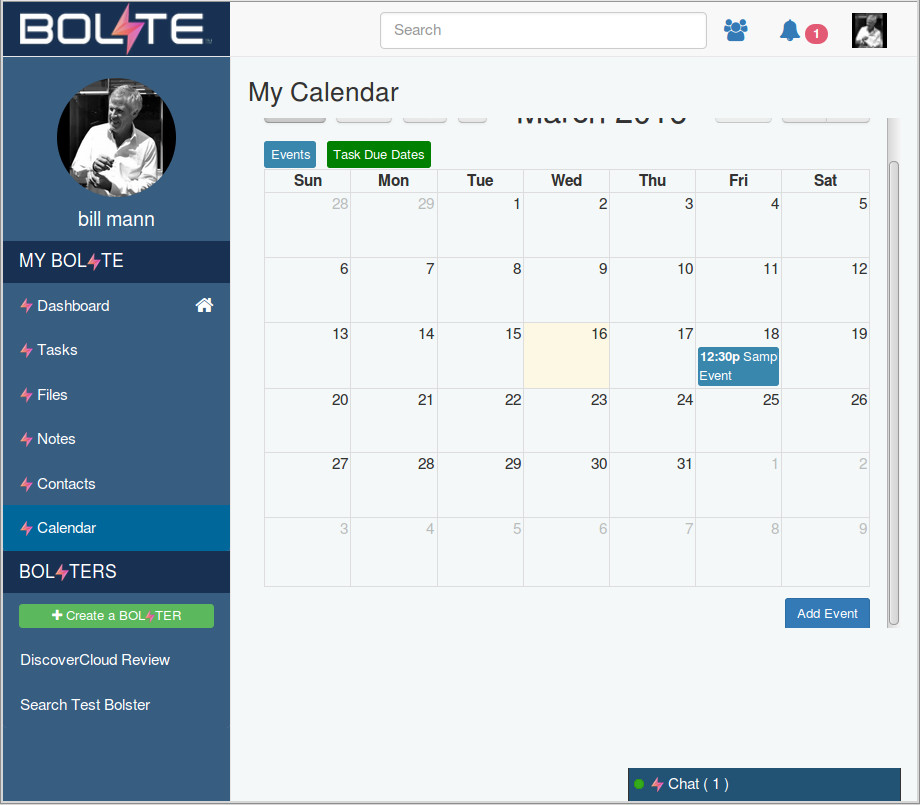
You create new events by clicking the blue Add Event button on the right side of the window below the calendar. Note that you may have to scroll down to find the button. Unlike a product like Microsoft Outlook, where Events and Appointments are different things, in Bolste, there is no such distinction.
The events you create here can be for a set time. They can be all-day events or multiple-day events. And you you can invite other people to your events, all from the same place. They are really quite flexible.
As of the date of this review, there was one minor issue with the Calendar section. Directly above the Calendar there were Events and Task Due Dates buttons. It was unclear what these buttons are meant to do, because they were not functioning at the time.
Other Controls
Regardless of where you are working within Bolste, you always have a few specific controls available. They appear in the top right corner of any window.
From left to write, they are:
- A Search field. Everything that you can see in Bolste is searchable, even if it is not in the part of Bolste you are currently working with. This is very powerful, but can be confusing as it is not always clear where the items you find are located. More on this when we talk about Bolsters.
- Connections. Click the Connections icon to invite people to join Bolste and collaborate with you.
- The bell-shaped Notifications icon comes next. As the name implies, this is where you will get notified of things within Bolste that are relevant to you. These can be anything from notifications of a new note or status update, to an invitation to join a Bolster.
- The Account icon. Click this icon to see a menu of options relevant to your Bolste account.
- At the bottom right of the Bolste window you will see a Chat object. Select it to chat with other users.
We’ve reached the end of our quick tour of the different sections in My Bolste. Next we will take a look at creating Bolsters, then working with the sections within them. Because these sections are similar to their My Bolste counterparts, we will focus on the differences.
Creating a Bolster
Anyone can create a Bolster to organize their work. Users are allowed to create an unlimited number of Bolsters and can likewise join an unlimited number of Bolsters created by others. The process is simple:
- Click the Create a Bolster button on the left side of the Bolste window. Note: If you are creating a Bolster for the first time in this account, a wizard appears that walks you through the process.
- Enter a Name for the Bolster.
- Enter an optional Description. Any description you enter here will always be visible to every member whenever they are working in the Bolster.
- Optionally invite people to join the Bolster (you can also invite people once the Bolster is active). You do this using the Members field. To invite a person, enter their Bolste contact name or their email address in this field. Continue entering these one at a time until you have invited everyone. If you enter an email address, the service will email them an invitation to join Bolste and become a member of this Bolster. Another way to invite people to join your Bolster is with the Gmail and Yahoo buttons. Click one of these and Bolste will open a new window where you can log into your Gmail or Yahoo Mail account. Once there, you can select contacts you wish to invite to join Bolste and become members of your Bolster.
- Once you are done inviting people, click Create. Bolste sends out the invitations and creates the new Bolster.
The name of your new Bolster will appear in the left-hand column of the Bolste window beneath the Create a Bolster button.
Working in a Bolster
When you want to work inside one of your Bolsters, you simply click it in the left column of the Bolste window. This takes you to the Bolster’s Activity section.
Activity
This section functions almost exactly the same as the Dashboard section of My Bolste. The primary functional difference is that the activities shown here are only those for the Bolster. And because the “What’s going on” field here only applies to this Bolster, you don’t need to specify which Bolster the comment should appear in.
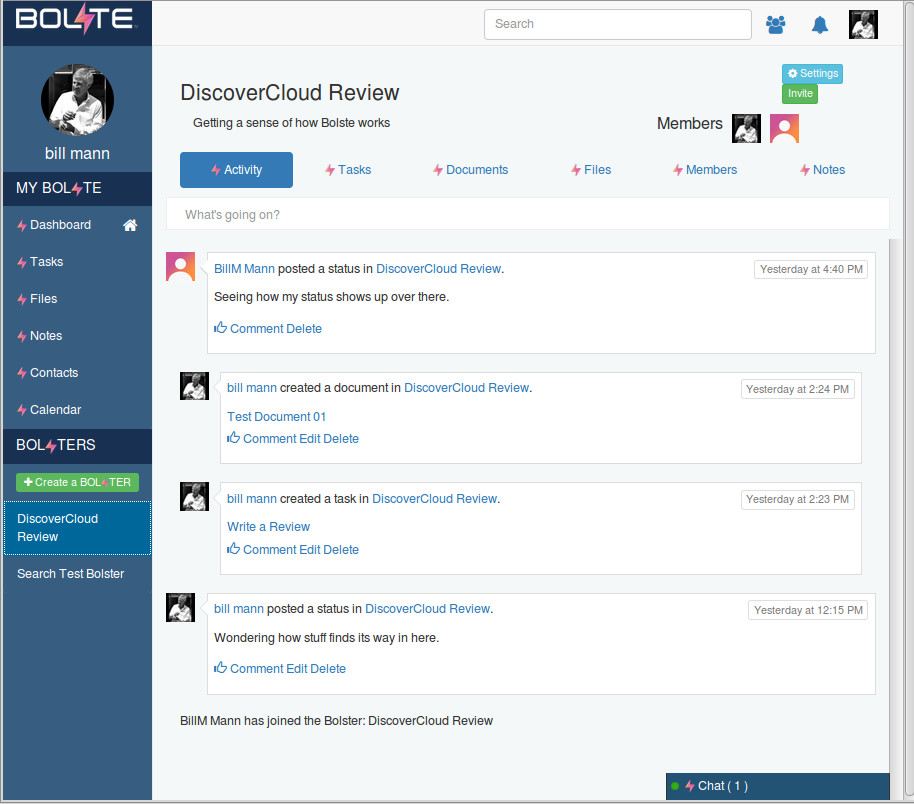
- At the top left of the Bolster you see a heading consisting of the name of the Bolster and its description.
- To the right of heading are the Avatars that represent the members of the Bolster.
- Near the top of the window you will find the Settings and Invite buttons. Settings allows you to leave the Bolster if you are a member, or delete the Bolster completely if you are the person who created it. Invite allows you to invite new members to the Bolster.
- A set of buttons appears across the top of most Bolster views. These buttons, Activity, Tasks, Documents, Files, Members, and Notes, allow you to navigate to the different sections of the Bolster. Note: If you don’t see these navigation buttons, you can click the name of the Bolster in the left-hand column of the window. This will take you back to the Activity section of the Bolster and the buttons should be visible again. If you do this and still do not see the buttons, try resizing the browser window or zooming it in and out until they reappear.
- Directly below the buttons is the “What’s going on?” field. Enter text in this field to post a status message like the ones you can see in the screen shot. Other comments and status messages will similarly appear in this area, allowing you to quickly see everything that is going on in the Bolster.
Tasks
The Tasks section in a Bolster functions almost exactly the same as the one in My Bolste. Again the exception is that the tasks you create and work with here are tasks that are assigned within the Bolster.
Documents
The Documents section of a Bolster is where you create, edit, and comment on documents. The editor used here has significantly more capabilities than the others we’ve encountered in Bolste. The most important of these are:
- Everyone in the Bolster can collaborate on a document in real time.
- You can import/export Documents in different file formats.
- Documents have a slider which allows you to scroll back and forth through the versions of the Document to see how it changed through time.
Much of the collaboration that occurs in a Bolster will likely occur in these documents.
Files
The Files section of a Bolster works the same as the one in My Bolste. Naturally, only the files that are uploaded to the Bolster appear in the section.
Members
The Members section of a Bolster is similar to the Contacts section of My Bolste, but displays all the members of the Bolster, even if they are not listed one of your Contacts. This section includes an Invite button that lets you invite people to join Bolste and become a member of this specific Bolster.
If you created the Bolster, you will also see a red Remove button to the right of the information about each member. Clicking the button eliminates that person from the Bolster. While the person will no longer have access to the Bolster, all of their contributions (Documents, Activities and so on) will remain in the Bolster.
Notes
This section is for creating and viewing notes within the Bolster. It functions significantly differently than the Notes section in My Bolste.
You can create a Private Note, which only you have access to. You can apply basic formatting to this note by selecting a section of text. When you do, some formatting options appear below the highlighted text. At the time of this review, you could only have one Private Note per Bolster.
In addition to the Private Note, you have the ability to edit a Bolster Note. Everyone in the Bolster can see and edit this note. There is only one note possible, and it is shared, and editable, by every member of the Bolster.
The Search Function Revisited
As we discussed before, there are several controls that are available anywhere in the service and apply across My Bolste and all the Bolsters you are a member of. Generally, that is very useful, but it can be confusing when it comes to searching. Here’s an example of what I mean:
I was working in one Bolster, and searched for a document that I knew was located in a different Bolster. Because the search function is global, it found that document with no problem.
However, the search results did not include any indication of where the document was stored. It would be easy to open a document from a different Bolster by mistake. To see where the document is locations, you need to click the View button for the document, then see which Bolster is selected in the left column of the Bolste window.
Adding an option to limit a search to the current Bolster or to My Bolste would eliminate this kind of problem and make the search option more powerful.
Mobile Apps
Bolste plans to support both Android and Apple mobile devices so users can work anywhere, using whatever device is most convenient at the time. However, the Android app was unavailable during this review so I was unable to test this particular aspect of Bolste.
Customer Support
I interacted briefly with Bolste Customer Support and was impressed.
When I began this review I had trouble logging on to Bolste. Late on a week night I sent an email to Bolste support describing the problem. I received a response from their support staff within minutes promising to look into the problem and get back to me as soon as possible.
The next morning the problem was fixed and I received a follow-up message advising me that I would be able to log on. It was fast and courteous support.
Conclusion
Software systems that support collaborative work are proving to boost business results at many companies. And cloud-based, SaaS solutions have proven to provide businesses with big boosts in productivity while eliminating the overhead of maintaining their own software and related hardware. But companies typically need to deploy several such collaboration tools to cover different aspects of the job.
Bolste addresses this problem by providing an all-in-one solution. By including features like messaging, file sharing, and collaborative document editing all in one package, they aim to make your staff even more efficient while freeing your business from the costs of separate products.
At the time of this review (March 2016) Bolste was only a few months old. All the core features of the product were active. After my initial problem signing up for the service (see Customer Support), I never again had a problem logging in. While my testing was limited (two users over a period of a week) I never had connection problems, nor did I ever lose any data.
That said, Bolste definitely has some rough edges to address on the user interface side. This is not unusual for such a new product. Since Bolste uses the SaaS distribution model, as they address their UI issues, those fixes will flow out to customers instantly. I would not be surprised if some or all of the issues I encountered were already fixed by the time you read this.
Bolste offers an all-in-one approach to collaborative work for any size business. And with a current price of only $9.99 per user per month, or $100 per user per year, this “business operating system” might be the right answer for your organization.
Bolste makes it easy for you to see for yourself if the product is right for you. They offer a free 14-day trial, so you can easily have a few people put the product through its paces in your work environment. They also offer personal demonstrations of Bolste, where you can see the product in action and get your questions answered. Given the newness of this product, I suggest you to take advantage of this offer and schedule a Bolste demo first thing.
Read more about Bolste on DiscoverCloud.
Top DiscoverCloud Experts


Andy Pham
CEO and Founder of Zillable https://www.zillable.com
Software Development | IT and Infrastructure and 17 more
View Profile

Samson Enumula
Google working
Project Management | Chat and Web Conferencing and 2 more
View Profile
Interested in becoming a DiscoverCloud Expert? Learn more
X
Compare Products
Select up to three two products to compare by clicking on the compare icon () of each product.
{{compareToolModel.Error}}Now comparing:
{{product.ProductName | createSubstring:25}} X
{{CommentsModel.TotalCount}} Comments
Your Comment