
Suited for:
Enterprises
Helps with:
Business Process Management
Languages:
English, Chinese Simplified, Czech, Danish, Dutch, French, German, Italian, Korean, Norwegian, Polish, Spanish, Swedish
What is it all about?
The web based software that manages visitors to your office, from invitation to checkout
Video & screenshots
screenshots
Who is it for?
Freelancers
Startups
Agencies
SMBs
Enterprises
Key Features
List of visitors of the day Compatible with most badge printers Automatic emails and notifications (to visitors and hosts) Emergency list (accessible from everywhere) Picture of visitor (pic on badge) Check-out enforcement (email notification to the host) Visitor screen (iPad compatible, customization possible) Invitation e-mail sent to visitor (incl. logo and Ggle Maps) Address book (for fast selection of recurring visitors) Add attachment to a visitor Manage group of visitors Easy import or invite of all staff members Custom fields (drop-down, free text or yes/no) Visitors to accept Terms & Conditions on kiosk Import or invite colleagues to join Upload own kiosk background image Recurring visitors Badge editor ID scanning (coming soon)
Benefits
1. Impress your visitors with SMS reminder 2 hours before meeting, branded checkin screen and more 2. Impress your employees with a SMS or an interactive email informing them that their visitor has arrived 3. Professional image, no more logbook lying at reception desk 4. Align welcoming of visitors across all locations of your company 5. No long term commitment, easy to set-up, 30 days free trial
Advertisement
Pricing
Yearly
Monthly
Lifetime
Free
Freemium
Trial With Card
Trial No Card
By Quote
Description
SMALL
$40/mo
ALL functionalities but printing
100 visits per month
MEDIUM
$100/mo
ALL functionalities
250 visits/month
starting at
$44/Month
for Unlimited
starting at
$480/Year
for Unlimited
Integrates With


Product Analysis


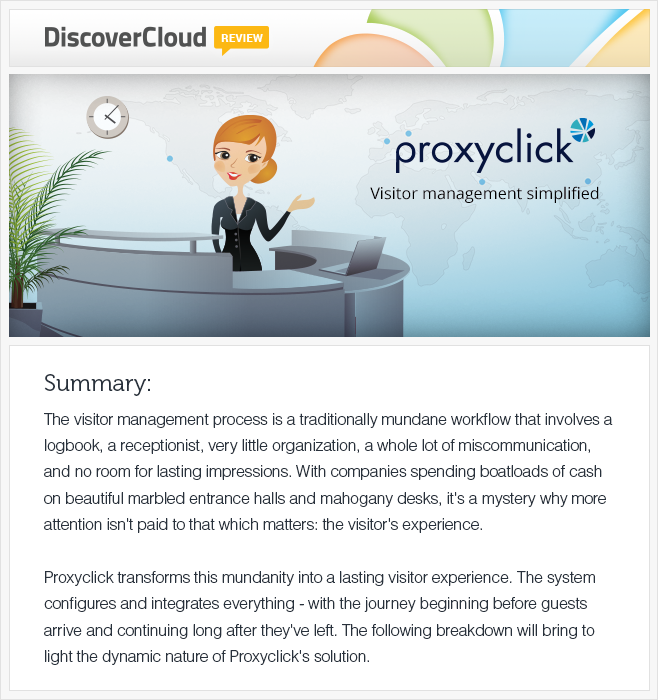
Proxyclick Review – Transforming the Visitor Management Process into an Experience
Checking in is perhaps the most mundane aspect of any visit to an office or event. You show up, walk up to a receptionist, tell them your name, and wait as they sift through their logbook looking for your information. After successfully finding you in their filing system, they proceed to hand you a small badge or sticker with your name on it.
This is something that all corporations, law offices and big accounting firms have in common. They all need to deal with people, in people, who come to them on a daily basis. And to do so, they likely all have a receptionist who takes phone calls and checks people in for appointments.
But what if there was a way to turn this check in process into an experience? What if there was a way to tell people we are on our way before we get there – without having to waste time writing messages and making calls while downing our coffee?
Multinational corporations routinely spend millions of dollars to renovate their offices and give off a great first impression, but in order to check clients in, they use a logbook at the reception desk, which brings forth all sorts of concerns (think competing clients being able to openly view who saw a lawyer and when).
Proxyclick, a visitor management platform, aims to provide a streamlined process to the check in experience. For over 5 years, Proxyclick has been paving the way for this market, and there are very few competitors that are aimed directly at this corporate visitor management landscape.
Evidently, they are doing something right. So let’s take a look at what exactly Proxyclick has to offer.
Getting Started
First and foremost you need to open an account. You can start with a free, 30-day trial. No credit card is required, so you can rest easy knowing that if you forget about your trial run, you won’t get charged at the end of the month.
Proxyclick’s User Interface (UI) and User Experience (UX)
The UI of the Proxyclick website is smooth; simple tabs and bars, nothing jumping out at you, and the blue and white color scheme is easy on the eyes.
The UX is all about simplicity. Let’s go through the interface:
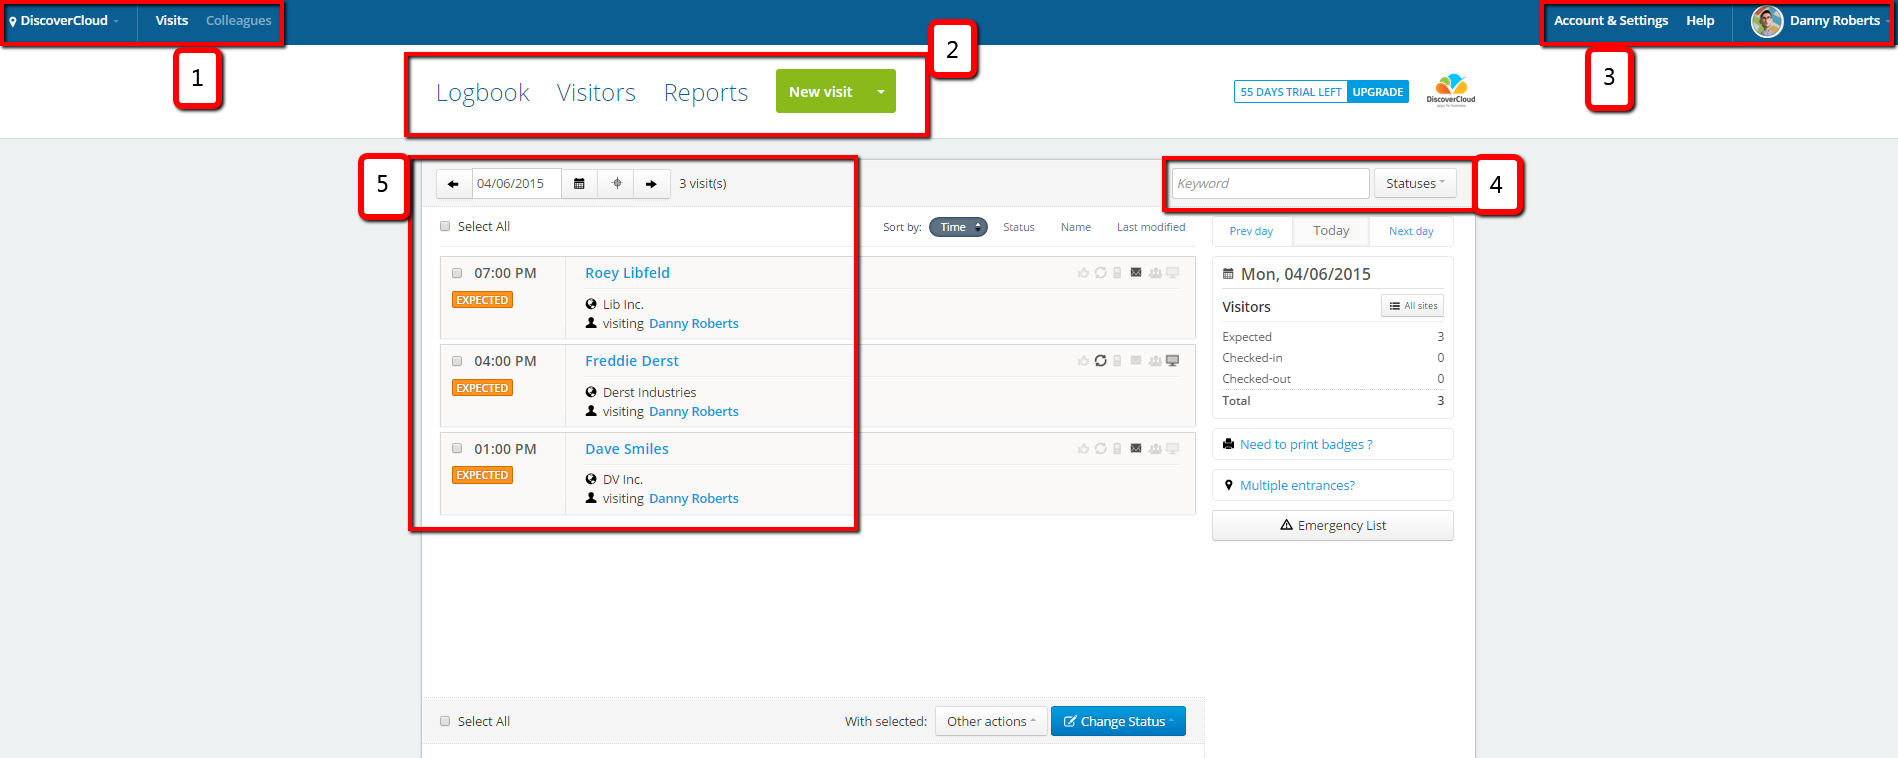
- On the upper left-hand side, you’ll see your company’s name, as well as a “Visits” tab and a “Colleagues” tab. When logging into your account, you’re automatically directed to the Visits/Logbook tabs, which act as your account’s homepage, and shows you all of the occurrences during that day.
- In the middle of the homepage, you’ll notice the following tabs: Logbook, Visitors, Reports, and a “New Visit” dropdown menu.
- And on the top right, you’ll see your Account & Settings, as well as your own profile’s details
- Conveniently, there’s a search, as well as a mini overview of the day’s events. You can also use this overview to look at yesterday’s events, as well as tomorrow’s events.
- This section of the page gives you a visual representation of the visits your company has planned for the day.
Overall, it’s a breeze to use. Very little learning curve.
Web Access and Cross-Browser Compatibility
The website is easily accessible from almost any device with a full web browser. I used an iPad Mini, Android based Lenovo Yoga Tablet 10, and my own personal Windows 8.1 based tablet to get into the website and use it. Overall, the website works best on a full PC. In terms of mobile options, I had a noticeably superior experience using the website from my iPad mini (Safari) compared to my Lenovo Yoga Tablet 10 (Chrome).
Account & Settings – Customize the Experience
Clicking on the Account & Settings tab brings users to a page that is ripe with customization options.
You’ll automatically land on the General Settings customizations, in which you’ll be given options to edits your company’s profile, including things like: company name, time zone, logo, location, etc. Take a look:
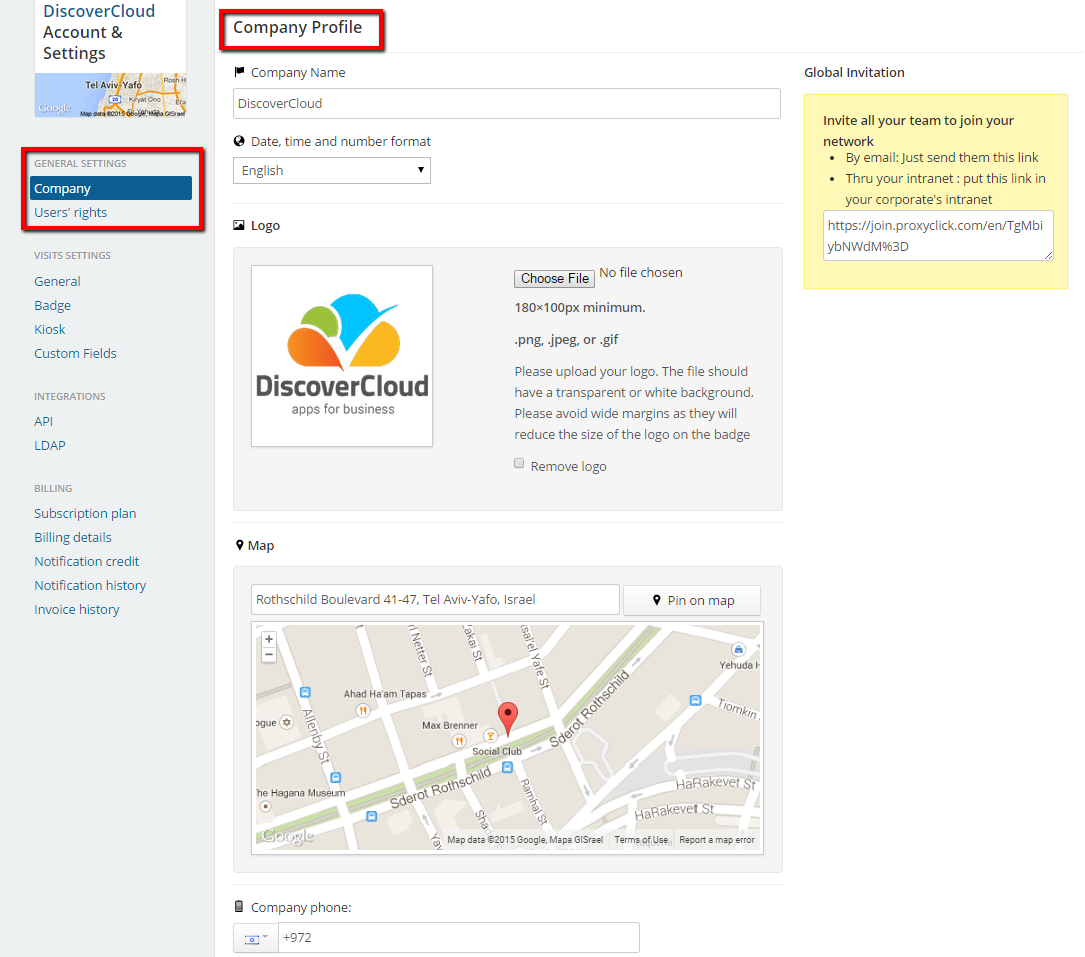
The company logo you upload will then be applied to the heading of all company documents, and is used as the background for the Kiosk App, as well as an option in the badge editor. This creates consistency in branding your company.
The small, navigable map is a great feature that lets you display your company’s exact location to visitors, so they can easily get directions in the event that they forget where your office is.
Under the map, users can insert a company phone number, and can select from a variety of available country codes to precede the number.
It’s a truly multinational setup.
Managing Your “Users’ Rights” section
Located here are the options for controlling and changing the permissions of six different types of users. Colleagues can be categorized as one of the following: All, Administrators, Agents, Security, Reception, and Assistants; and each of these accounts have different permissions granted to them.
To change user permissions, you can either navigate to your account settings, or to your colleague address book [to be discussed in sections below].
API Details
Proxyclick has recently made their API public, thereby allowing the platform’s users to access pertinent information about visiting clients.
Proxyclick’s API works like many other SaaS applications, so in order to retrieve information from their API, you’ll first need to register and authenticate your app in the system. You’ll then be able to retrieve all kinds of information, from meeting dates and times, visitors names, visitor dates, a visitor’s telephone number, the longitude/latitude of your company’s local office in Hong Kong, and everything in between.
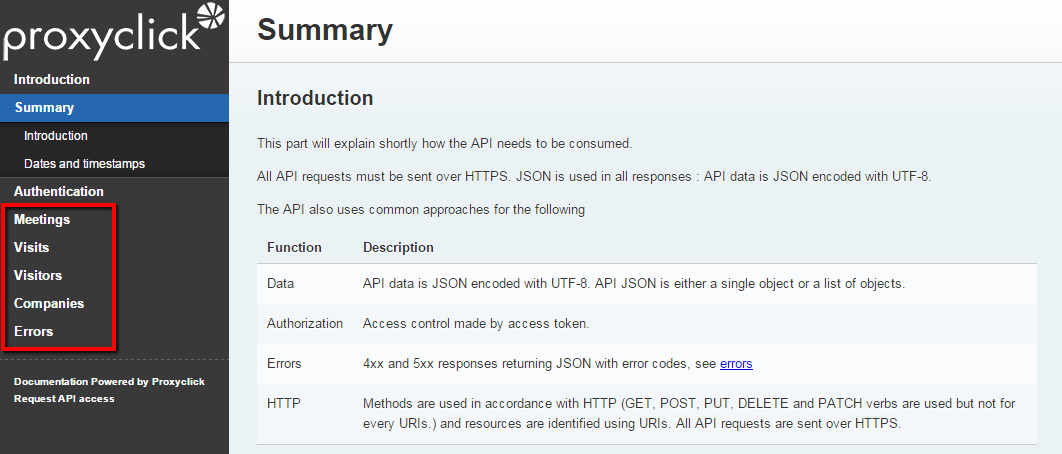
All API information is JSON encoded, so it’s easily consumed by human readers.
Lightweight Directory Access Protocol (LDAP)
LDAP enables Proxyclick’s system to do two things. The first is to retrieve a list of employees and colleagues that is always synchronized with Proxyclick, thus making it easy for visitors to find his or her host during the check-in stage even if the host just joined the company. The second is a single sign-on mechanism that allows employees to login to Proxyclick with their own email and corporate password.
As of May/June Proxyclick will also be SAML compliant as well as listed in the OneLogin App catalogue.
The Billing Section
This tab allows you to insert billing and payment information. It is split up into three sections, as follows: Subscription Plan, Billing Details and Invoice History.
It’s organized pretty well, and just like the rest of the Proxyclick interface, is super easy to navigate.
The Logbook
As mentioned above, the Logbook acts as the homepage for your Proxyclick account. It essentially gives users a quick and convenient way to view the latest check-in and checkouts at their company, school, university or event.
Let’s say Harry, the most important client of the day, is expected to arrive on time. Within the logbook, colleagues can discuss whatever is needed to be prepared for the meeting. Take a look at the example below:

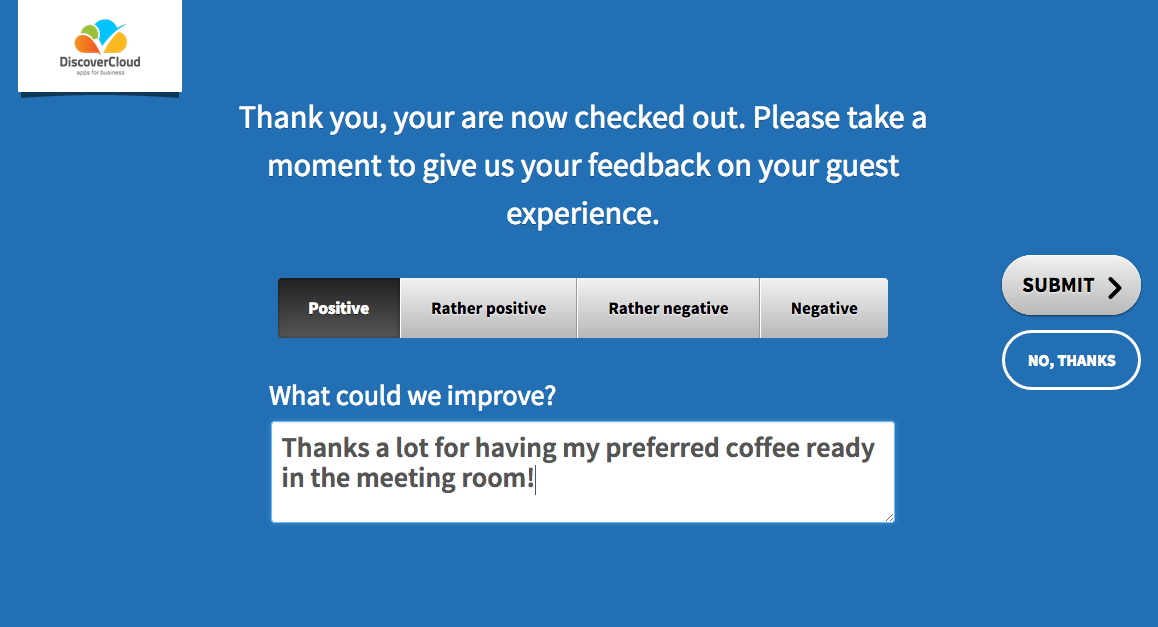
Proxyclick’s goal of turning a process into an experience is truly brought to the surface here, as visitors who checked out using the kiosk (to be discussed in sections below) can leave feedback with regards to their experience at your business or event.
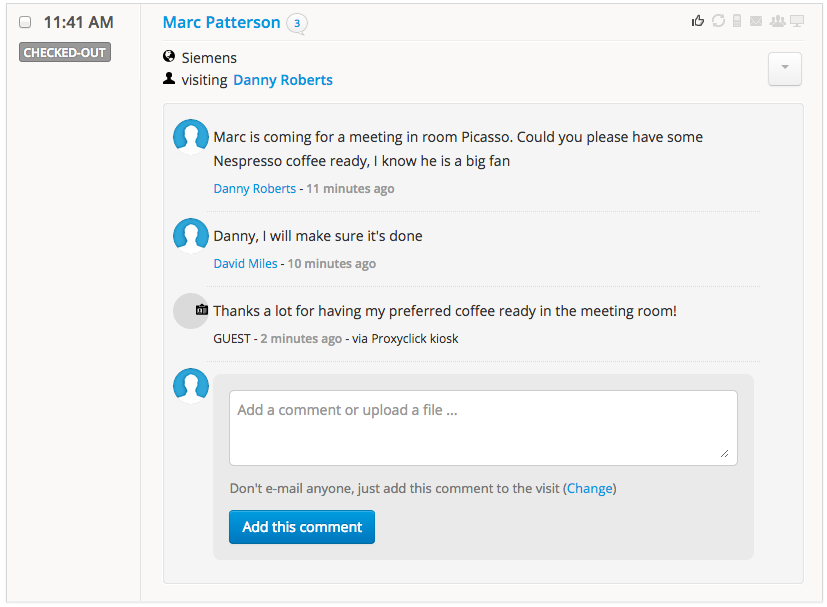
This is an essential tool for improving the visitor experience. Whether it’s a visitor’s love (or distaste) towards your company’s chosen brand of coffee, or if the parking lot was full and the visitor was forced to pay for street parking, this feedback will be recorded in Proxyclick’s system so you can take a proactive approach to bettering the experience.
Plus, you can use the Logbook to remind yourself exactly whom it is you’re dealing with. Maybe you forgot the clients name or primary spoken language? It’s all there, right before your eyes, so you can brief yourself before they get into your office – or even while they are sitting in front of you.
On the top right corner of each event there are a number of icons indicating various statuses that can be attributed to visitors. For example, if a visitor was satisfied with their experience and gave positive feedback at checkout, this will be indicated by the thumbs-up button. Additionally, there are symbols to indicate if the visitor is part of a particular group, a symbol showing whether or not a reminder was sent, and a few others.
What’s more, you can even filter the Logbook information by Time, Status [i.e. expected, checked-in, checked-out, etc], Name, and Last Modified.
The “New Visit” Button
Creating a New Visitor
Clicking on the “New Visit” tab starts a new appointment for a visitor or group of visitors. You’re then directed to a page that looks like this:
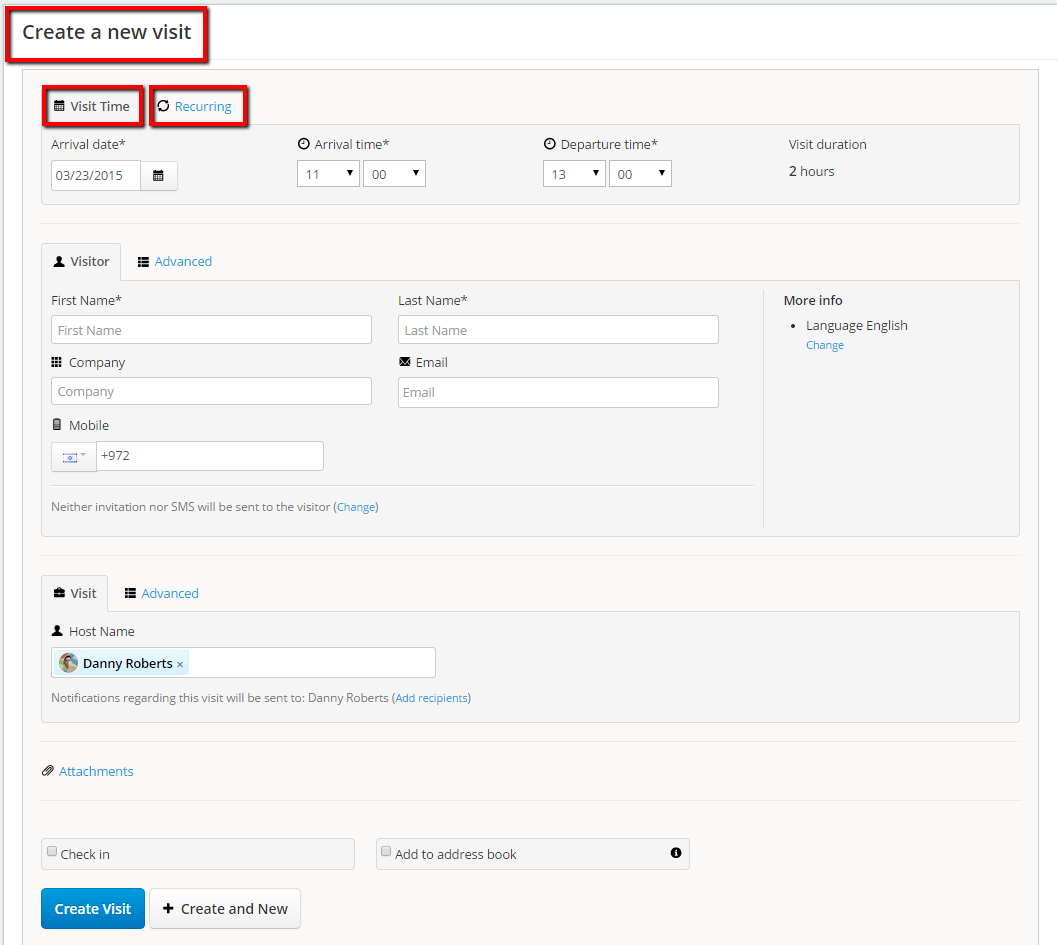
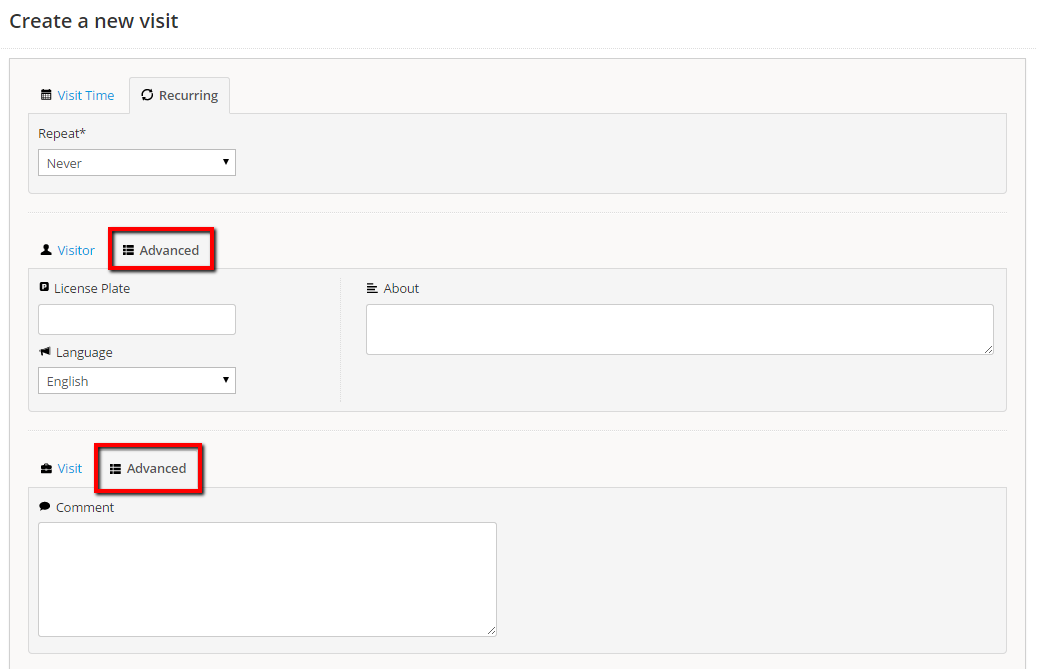
Notice the two tabs available, “Visit Time,” and “Recurring.”
You start by inputting some information about the visitor’s details, such as: the name of the visitor, the date/time of the appointment, language, contact information, and more. You can then either make the visit a one-time thing, or click the “Recurring” tab to make it a “Repeat” visit.
A repeat visit feature is especially important for consultants or contractors who attend several meetings on a regular basis during a set time period.
You also have some advanced options, which let you include license plate numbers, “About” information for the visitor and/or the company they represent, and even your own comments about the visitor. You can also add custom fields here for more open-ended comments.
Creating a New Visitor Group
Creating a new visitor group is a great way for corporations to keep track of the different companies and representatives with whom they work.
First, you can name the group. Then you have the option to either add each constituent one-by-one, or import them in bulk from an .XLS file, a feature that’s very convenient for training centers or corporate headquarters which regularly welcome large groups of visitors.
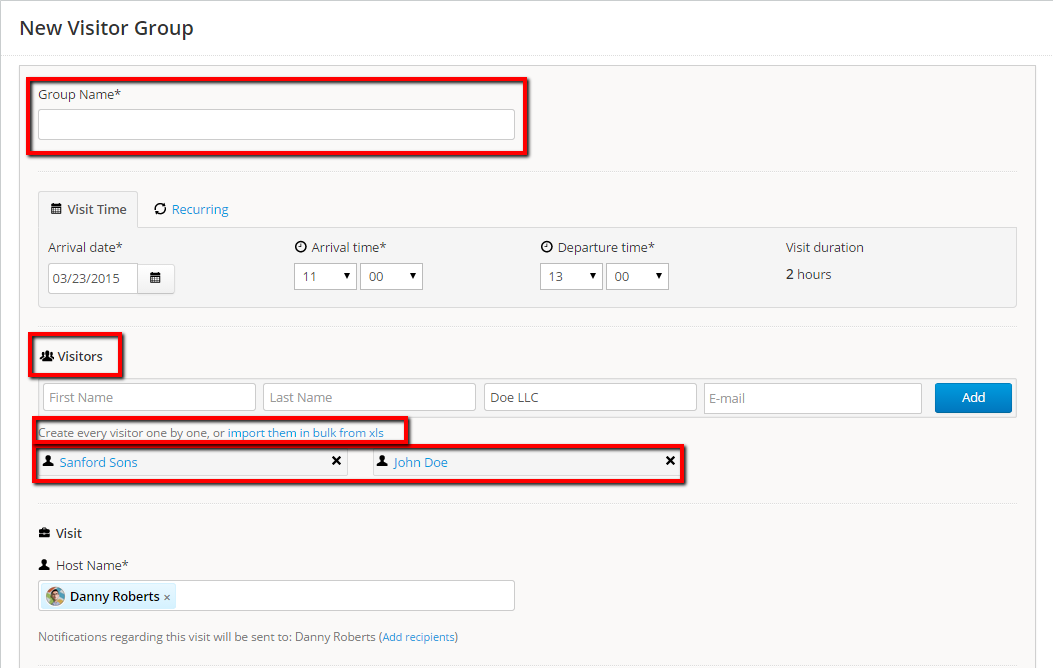
From there, you can set this group as either being a one-time visit or recurring, you can add individual members to the address book, and you can elect to send invitations via e-mail.
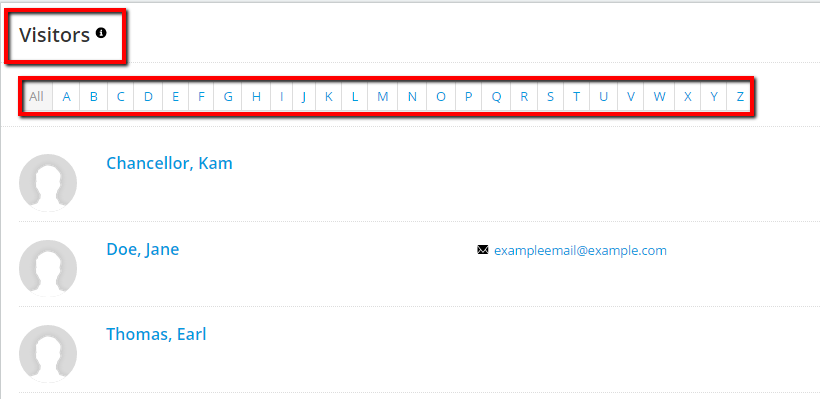
The Visitors Tab
The visitors tab is essentially an address book of all visitors that you’ve ever recorded in the system. They’re sorted alphabetically, and visitors can also be searched for by last name. Take a look:
When you click on a contact in the address book, you’re brought to a page in which all of their details are displayed in an almost post-card like manner. Information such as the contact’s company position, license plate number (useful if you have a parking lot) and contact details are all immediately visible. Check it out:
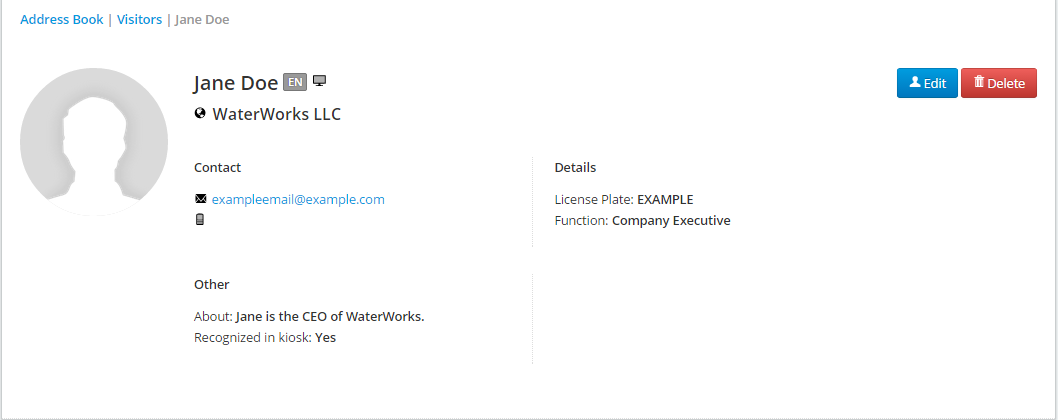
Notice any errors pertaining to the visitor’s information? Edit it quickly using the included “Edit” button.
The Colleagues Tab
The “Colleagues” tab acts as your address book for your colleagues. Just like the visitor’s address book, this address book is arranged alphabetically, and can be searched navigated by using the same method as discussed above.
You have to options to add colleagues from the address book; the first is adding individual colleagues, and the second is importing colleagues in bulk. The import function is seamless, and as you are using a “modern” browser, you won’t have any problems.
Conveniently, Proxyclick provides you with a template file to ensure your import is effective. The template file is really just an Excel document with properly labeled columns so fields will match up perfectly during the import.
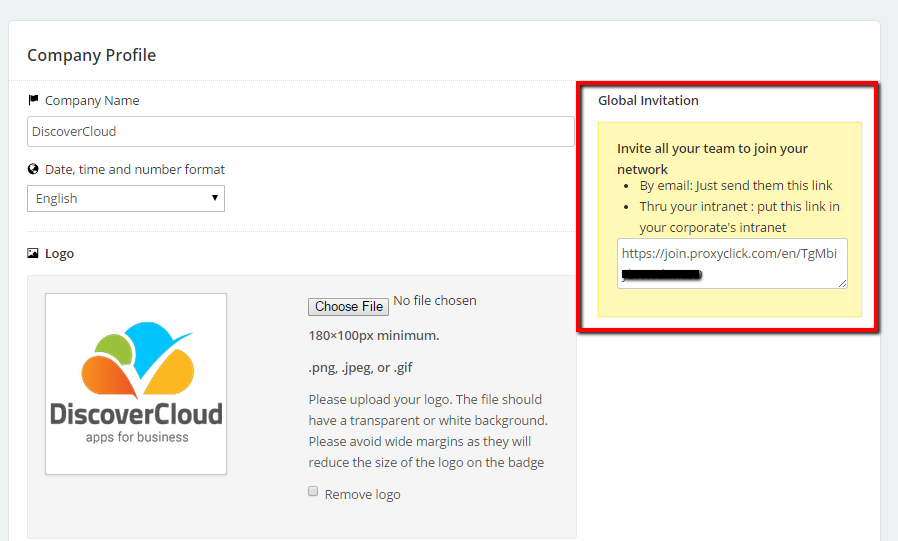
If you prefer your colleagues to join Proxyclick on their own (the advantage here being that they can pre-register their own visitors), you can send the link to your colleagues, a feature that can be found in in the yellow box on the right-hand side of your Account & Settings dashboard:
From the Colleagues tab, you can also manage the rights of users within your system. So, for example, if you want to give a colleague administrative powers, here’s where you’d do so.
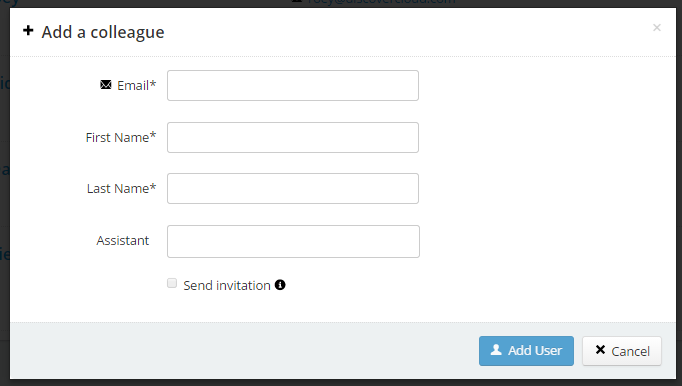
Adding a Colleague
Clicking on the “Add a Colleague” button will open up a simple pop up where you can insert a colleague’s name and email address. You can also associate a personal assistant to them if he or she needs to be notified as well when visitors check-in or don’t check-out.
You can even insert a custom message and pick the permissions available to each colleague directly from this page. Check it out:
Note: if a colleague already uses Proxyclick in another location the system will make sure not to duplicate the user.
The “Reports” Tab
One of the most important functions any business needs in order to be at the top of their game is the ability to track the three big W’s – who, where and when. Proxyclick provides a clean and easy to understand graph for showing all of this data. Number of visitors per month over a period of time, where they checked in, when they checked in…it’s all there, and is very easy to understand and use.
Additionally, it can be downloaded and saved as an XLS file for those times when you feel like viewing a spreadsheet!
Automated Emails & System Alerts
Check In Alerts
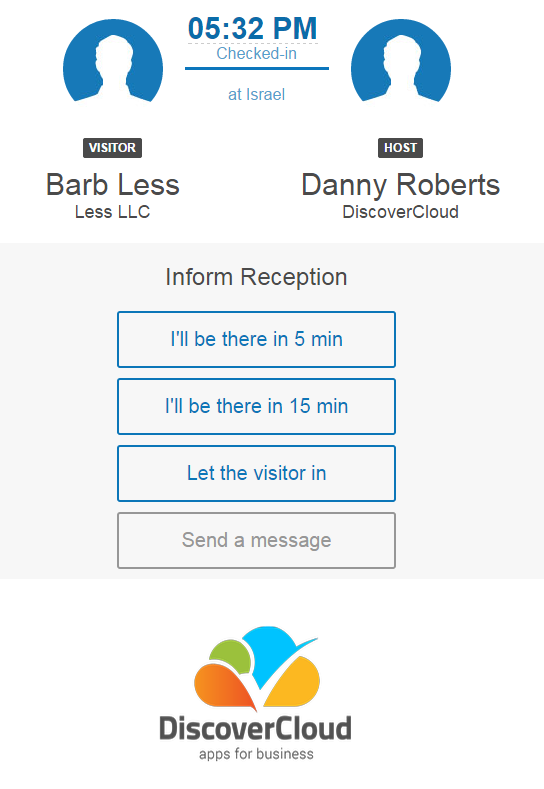
This feature enables users to send out real-time reminders about who is scheduled toarrive and when. First off, the visitor [let’s call him Mr. Hendricks], will receive an SMS reminder 2 hours before his scheduled visit reminding him of the impending visit details.
But lets say you, the host of Mr. Hendricks, are running 15 minutes late.
When you’re notified of Mr. Hendricks’ arrival via the check in email, you’re then given the option to send a templated response that indicates exactly when you’re supposed to arrive, and any instructions for your front-desk receptionists. The message looks like this:
A ton of work went into creating this email. Here’s an in-depth article on it:https://medium.com/articles-by-central/how-design-can-quickly-add-value-to-your-product-9559b6c469a0
It’s a great article that accurately conveys all of the research, planning, design and iterations that go into seemingly simplistic product features.
Aside from this email, you can also get an SMS of arrivals sent to your mobile phone if you so choose (a customizable option in the system for each visitor/colleague).
Furthermore, you’re able to designate your secretary as your “assistant” within the system, so that they have any and all permissions required to handle the details of Mr. Hendricks’ visit, including receiving SMS messages and email notifications. This feature is truly a process stream-liner.
A Few More Email Alerts
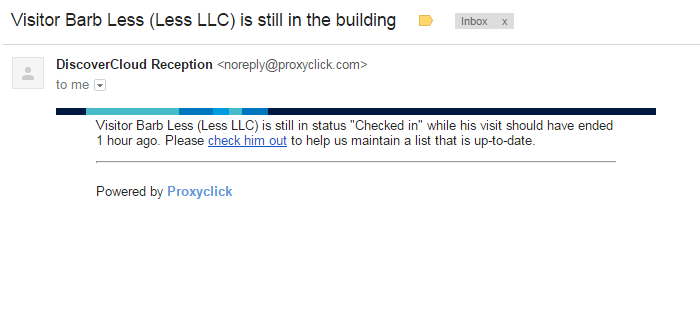
While tracking arrivals is easy, how do you track departures? Proxyclick generates an automatic email that is sent to each host exactly one hour after the planned end of the visit (assuming the visitor has not checked out). A host can then checkout his/her visitor by clicking on the link that’s generated in the email.
This allows Proxyclick’s emergency list, which includes all people that are currently in the system, to be constantly synced.
Plus, you (the host), will keep receiving email alerts indicating that your visitor is still in the system and has not yet checked out. Emails will be sent over the next 24 or 48 hours, after which point your visitor will be automatically checked out. These alerts look something like this:
System administrators can automatically checkout guests if they see that the guest has not done so themselves.
A newly implemented feature is an automated email alert that’s sent out to the visitor’s host once that visitor has checked out.
This is just one more way that Proxyclick makes sure everyone in the organization is up-to-date and no visitors are aimlessly wandering the corridors, unbeknownst to their host.
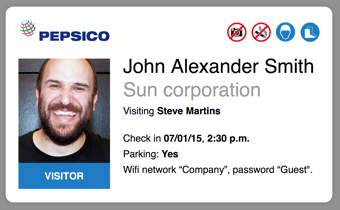
The Badge Editor – Designing & Printing Badges
This an important feature for corporations in which visitors are coming and going through a seemingly (or literally) revolving door throughout all hours of operation. It is absolutely essential that your visitors are handled in an organized and timely manner throughout all contact points within the visitation. Proxyclick conquers this need by allowing you to print informational badges for each and every visitor that checks in.
The badge editor is a What You See Is What You Get (WYSIWYG) interface that allows you to customize all aspects of a page, and view those customizations in real-time.
It allows for a whole lot of variability, including adding your company’s logo, customized safety icons (such as “no smoking”), and custom footer notes (such as the guest Wifi code). Not to mention, you can change color schemes, and add additional fields.
![]()
Proxyclick’s badge printing system supports all printers and badges can be printed in 85mm x 51mm size. Give the setup guide a quick read to see how easy it is to get started.
Once finished, your badges can look something like this:
Multiple Entrance Management
Let’s say your company has four main entrances, located on the north, south, east and west side of your swanky office building in Lower Manhattan.
In order to have a great client experience, you want your visitors to feel like they’re coming into the same office each time, no matter where they’re entering from.
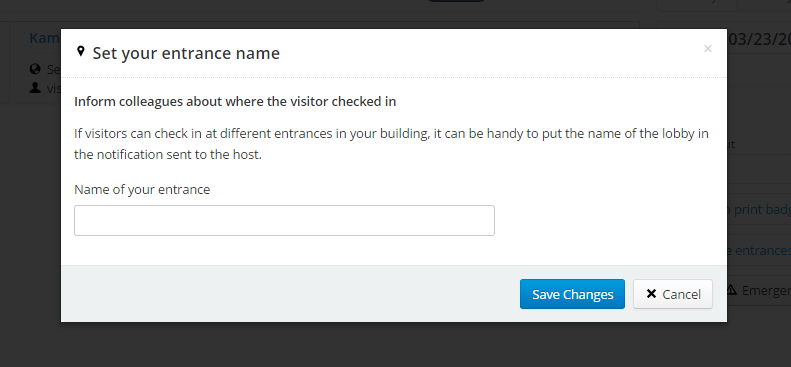
Proxyclick lets you easily set up a visitors kiosk at each and every entrance, and each kiosk will feature the exact same branding experience of your choice. This simple, albeit effective features serves to tell your clients, “Still the same company, just on the other side of the building.” You can even customize the entrance’s name so all colleagues will be informed as to where the client checked in. Take a look:
The system is constantly syncing information so you don’t need to worry about a delay causing someone on the other side of the building to think your invitee never checked in.
The Kiosk App
Currently, Proxyclick’s Kiosk App is embedded within existing kiosk apps (both iOS and Android). However they’re launching their own dedicated app in the summer.
To begin the setup and customizations for your Proxyclick kiosk the app, type in this subdomain: kiosk.proxyclick.com. You’ll then need to insert a License Key (provided free of charge) to get the kiosk webpage up and going.
After that, the kiosk runs automatically as a web page that can be opened from any device. You can easily brand the page by adding logos or a background picture of your choosing. The Kiosk app works perfectly well on a standard PC (touch or not), so no need to have a tablet.
From a visitor’s perspective, checking in is super simple. The system auto-fills the forms once you begin typing, provided that you’re already in the system [which if you’re a visitor and you have an appointment, then you are].
The whole check-in process takes 5 clicks, and it’s as simple as it gets. Here’s where it begins:
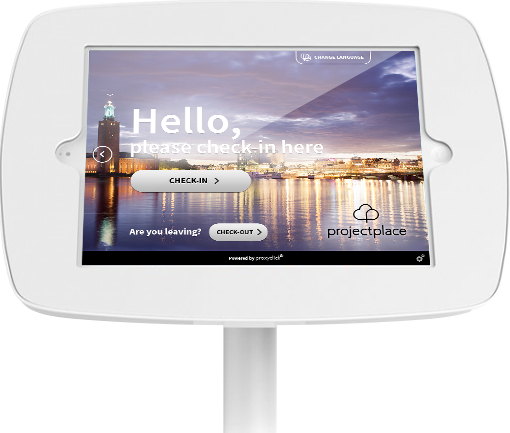
Checking out is also super smooth – one-click process smooth.
Proxyclick is dedicated to transforming the check-in/checkout process into an experience, and the Kiosk app is a perfect example of this – mostly notably in the way that it allows visitors to easily give feedback on their visit. Here’s that experience at a glance:
Multiple Companies in a Single System
A super cool feature within the kiosk app is the ability to use it for multiple businesses that occupy the same building. This way there’s no need for each business to take up space in the building’s entrance with their own tablet running its own kiosk. Multiple businesses – one check in. Perfect. Check it out:

Multiple Locations
For corporations that have (or are in the process of establishing) multiple locations throughout the globe, Proxyclick allows you to easily “Create a New Site” by simply adding an address for wherever your new office is opening.
From there, you’re asked to add the following details:

After which point you can easily add new colleagues to the location and get the system up and running in minutes.
Pricing
Proxyclick’s pricing page is set up really neatly. For starters, on the top left of the page you can select which currency you would like to view your plans pricing. Options are bound to; dollars, pounds, and euros. Clicking on the tab will show you the prices of each individual plan in the currency you opt to check.
So how much are the plans, which are priced like french fries at a certain international fast food chain (hint, its not Applebees). A “Small” plan costs $40 a month and will let you work with 100 visits. A “Medium” plan costs $200 a month and will let you accept 250 visits. A “Large” plan costs $150 a month and will service 500 monthly visits. Finally, the “Enterprise” plan costs $260 a month and will support 2000 visits, as well as third party integration. Locations above 2000 visits typically fall under a custom plan, you need to contact them for that.
Users can decide if they want to pay for the service monthly, or purchase the service for a year (which provides a 10% discount on the price) or pay for two years (a 20% discount).
Additional charges
If you go over your monthly visit limit, you are going to get charged for it. The question of how much depends on what package you were subscribed to at the time. Thankfully there is no fee for cancellation.
Some Final Thoughts
Proxyclick is truly a pioneer in the industry, and in addition to their software, the company is dishing out some pretty awesome content that’ll show you how to help move your company’s reception desk into the 21st century.
For a company that claims to simplify visitor management from invitation to checkout, they certainly deliver, from start to finish. No more excuses for missed appointments (I forgot / I lost my details / I lost contact info…you know the drill). So if you’re using a pen and paper to manage your reception desk, it’s probably about time that you went digital, don’t ya think?
Top DiscoverCloud Experts

Andy Pham
CEO and Founder of Zillable https://www.zillable.com
Software Development | IT and Infrastructure and 17 more
View Profile

Sanjay Sharma
Helping Business With Digital Transformation
Customer Management | Business Utilities and 6 more
View Profile
Vinnie Dhima
Excel Distance Calculators
Business Utilities | Operations and Workflow and 6 more
View Profile
Paulo Henrique Horta Silva
FINALIZAR GRANDES VENDAS
Sales and Marketing | Accounting and Finance and 25 more
View Profile
Interested in becoming a DiscoverCloud Expert? Learn more
X
Compare Products
Select up to three two products to compare by clicking on the compare icon () of each product.
{{compareToolModel.Error}}Now comparing:
{{product.ProductName | createSubstring:25}} X
{{CommentsModel.TotalCount}} Comments
Your Comment